5

One of the features of Clarion 7 is code completion, also called intellisense. Unfortunately it does not work in the embed editor but it does in the source editor and the Embeditor. The Embeditor is what you get when you right click on a procedure and select "Source" from the popup menu or open the Embed tree and click the Source button.

In one of the recent builds, Softvelocity gave us an option to open the Embeditor when we double click on an embed in the embed tree and thus give us full use of the intellisense.

It is easy to set this up once you know where to look! Which is why I'm writing this as I have to hunt this down every time I do a clean install of C7.

But before we go further, I want to clear up something that causes a lot of confusion.

In Clarion there are 3 editors:
Source editor: This is what you get when you open a source file for editing. This editor works like any other editor and edits files only.

Embed Editor: This is the editor that you get when you go into an embed via the embed tree. This editor only displays one embed and does not have code completion.

Embeditor: This is the editor that you see when you right click on a procedure and select "Source" or hit the "Source" button in the embed tree. This editor shows all embeds and does have code completion.

There are three places that affect the code completion. To set it up, please follow these steps.

1. Open the Tools menu and select "Application Options" Note that this option is disabled if an application is loaded.
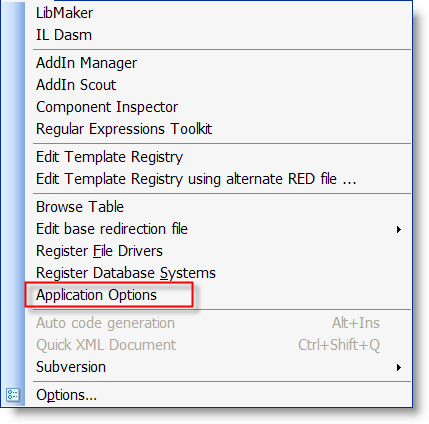
Clarion 7 Tools Menu

2. Go to the "Embed Editor" tab and make sure that the "Edit source embeds in context by default (Using Embeditor)" is checked.
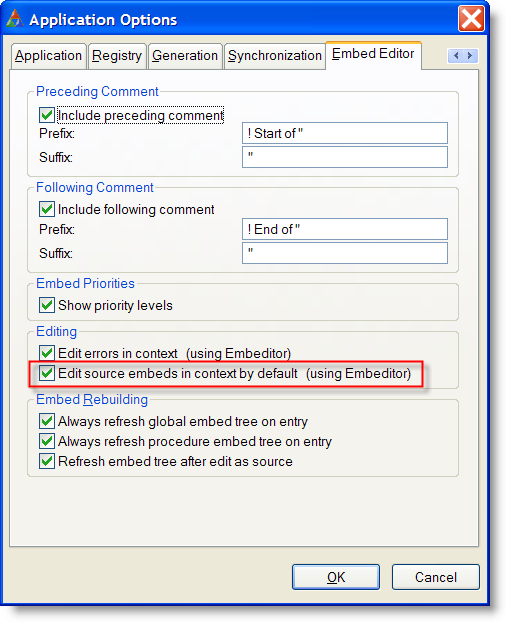
Clarion 7 Embed Editor Options

This allows you to use the Embeditor instead of the Embed Editor when you open an embed from the embed tree, giving you full access to the code completion.

3. Open the Tools menu and select the "Options" item which is at the bottom of the menu.

4. Select the "Text Editor | Code Completion" node in the tree on the left and check the options you want active. I believe that the settings I have are the default settings.
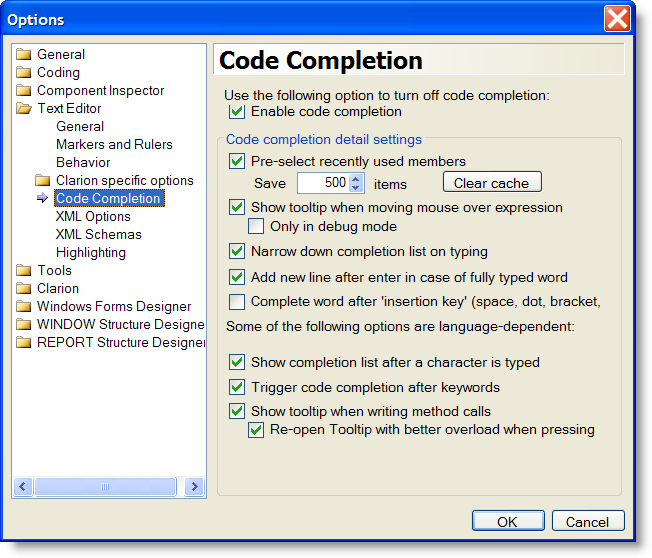
Clarion 7 Code Completion Options

5. Finally make sure that Code Completion is active in the Edit menu.
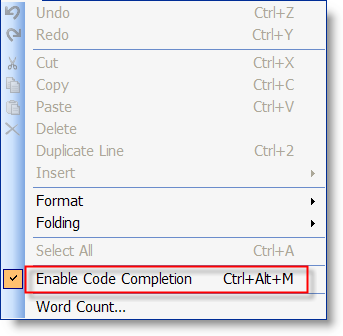
Clarion 7 Code Completion setting

Now when you double click on an embed entry in the embed tree, you will be taken directly into the Embeditor where you can edit your embed in context and get full use of the code completion/intellisense feature!
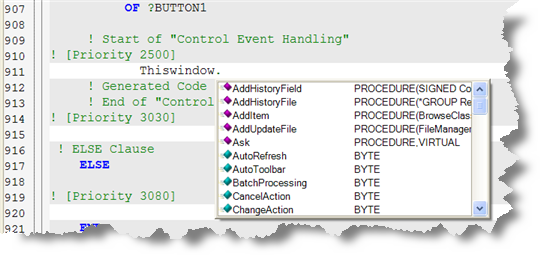
Clarion 7 Code Completion in the Embeditor

I hope this helps some people who are lost in where exactly to set this up.

Arnor Baldvinsson

1

Several weeks ago someone in the Clarion world mentioned LogMeIn to me as a way to remote control your computers. So I downloaded and installed their freeware version of it on my laptop and the two desktop computers that I work on.

LogMeIn

On mornings like today, when the weather is cool and crips, it is very nice to be able to light a fire in our wood stove in the living room and park myself in front of it with my laptop and access my desktop computers. It works pretty well on our LAN (which is mostly 1GB, cat 6, but my laptop is obviously wireless) and it is free! I have not yet experimented with LogMeIn over the internet.

The only problem I have had is that when I connect to my laptop from the desktops, it tends to log off after a few mintues and I have to keep logging in. I'm not sure what that is about but I rarely need to use that so it is not a big deal.

You can run it in full screen or you can run it contained within the browser. The color dept can be determined but beaware that it actually changes the color dept on the machine you are connected to. The color dept is restored when you diconnect from it, but it might cause confusion if you look at the screen you are controling;)

All in all, definitely worth looking into if you need to remote control your computers. They also have Pro2 version and several other products that can be combined to create powerful remote control setup to control external computers and create VPN settings but those products are not free and generally require a monthly or an annual subscription.

Arnor Baldvinsson

One of my customers contacted me couple of days ago to ask if it was possible to sort items in a drop button, when the items are created at runtime. Since the items are stored in a queue I figured it would be fairly easy.

 Toolbar1.DeleteItems(ID1_Name)

 Toolbar1.AddDropItem(ID1_Name,'Arnor','ok_16.ico',1)
 Toolbar1.AddDropItem(ID1_Name,'Robert','ok_16.ico',2)
 Toolbar1.AddDropItem(ID1_Name,'Monica','ok_16.ico',3)
 Toolbar1.AddDropItem(ID1_Name,'Ana Maria','ok_16.ico',4)
 Toolbar1.AddDropItem(ID1_Name,'Ivan','ok_16.ico',5)

 Sort(Toolbar1.BandQ.ControlQ.pDropButton.ItemQ,|
      Toolbar1.BandQ.ControlQ.pDropButton.ItemQ.szTxt)
 !! Reset the ItemIDs after sorting the queue.
 Loop I# = 1 To Records(Toolbar1.BandQ.ControlQ.pDropButton.ItemQ)
   Get(Toolbar1.BandQ.ControlQ.pDropButton.ItemQ,I#)
   Toolbar1.BandQ.ControlQ.pDropButton.ItemQ.ItemID = I#
   Put(Toolbar1.BandQ.ControlQ.pDropButton.ItemQ)
 End
 Display()

Note that this will not work properly if you have separators in the drop items. If you want to do that, I would suggest to add the item text entries to a queue and sort them before you add them to the drop button. Something like this might work:

AddDropButtonItems         ROUTINE
 Data
Q   Queue
T     CString(256) !! Item text
SF    Byte         !! Separator Follows
    End
 Code
 Q.T = 'Arnor' ;     Q.SF = False; Add(Q)
 Q.T = 'Robert' ;    Q.SF = True;  Add(Q)
 Q.T = 'Monica' ;    Q.SF = False; Add(Q)
 Q.T = 'Ana Maria' ; Q.SF = False; Add(Q)
 Q.T = 'Ivan' ;      Q.SF = False; Add(Q)
 Sort(Q,Q.T)
 Toolbar1.DeleteItems(ID1_Name)
 Loop X# = 1 To Records(Q)
   Get(Q,X#)
   Toolbar1.AddDropItem(ID1_Name,Q.T,'ok_16.ico',1)
   If Q.SF = True !! Add Separator
     Toolbar1.AddDropItem(ID1_Name,'-','ok_16.ico',1)
   End
 End

 Display()

This should be able to handle sorted list with separators. I'm planning to add a method to sort the items alphabetically and I think I can make it handle the separators correctly too. The method I describe here is a bit more flexible as it gives you full control over how the items are arranged.

Arnor Baldvinsson

On some of the XP-Theme product download pages it was stated that XP-Theme works with Clarion 5.5. This is not correct. When the source was moved up to Clarion 6.0 by PowerOffice there were quite a few modifications made to the code to make it thread safe in the new Clarion 6 threading model. Unfortunately this also made the code incompatible with Clarion 5.5.

Since it is seven and a half years since the last Clarion 5.5 build was released (May 29, 2002 according to my zip files) I will not be attempting to port the current product back to 5.5 compatibility.

I have updated the website and download information to reflect this and hopefully I found all the places it was mentioned. If you see somewhere that XP-Theme is compatible with Clarion 5.5, I would appreciate it if you would please let me know:)

Arnor Baldvinsson

One of my customer asked how he could hide and unhide a band on a PowerToolbar on the application frame from a PowerToolbar button on his MDI window.

In order to do this you need to set up the MDI client template on the MDI window. PowerToolbar uses a global instance of the POToolbarGlobalClass to control the appframe toolbar from other threads. You can take a look at some of the methods in the online documentation.

The code you need to toggle the visibility of a band looks like this:

If AppToolbar.GetBandVisible(TB1_TestWindowBand) = True
    AppToolbar.SetBandVisible(TB1_TestWindowBand, False)
Else
    AppToolbar.SetBandVisible(TB1_TestWindowBand, True)
End

That is pretty much all there is to it. This is exactly the same code as you would use on the appframe itself.

Arnor Baldvinsson

You may find that you need to dynamically change the text in a header or item. This is a bit tricky in the currently public release, but is made much simpler in the next release.

In the current release, 2.0.111, you need to add a few lines of code to make this work. First of all you need to declare a group in your procedure data embed:

TskI GROUP(POB:TaskInfo)
     End

This declares a group that you then need modify.

 TskI = Outlookbar1.GetTaskInfo(OutlookBar1.Outlookpanel,0)
 TskI.Title = 'Changed Outlookbar Title'
 Outlookbar1.SetTaskInfo(OutlookBar1.Outlookpanel,|
                         0,|
                         TskI)

The first line loads the local group, TaskInfo, with the data from the header or item. The second line sets the title in the group and the third line updates the the header or item. Since this is rather awkward we decided to simplify this down to:

OutlookBar1.SetTitle(OutlookBar1.Outlookpanel,|
                     0,|
                     'Changed Outlookbar Title')

To download version 2.0.112, which includes the new SetTitle method, please go to Download Icetips Outlookbar 2.0.112

Arnor Baldvinsson

Sometimes it is necessary to update and refresh controls on the toolbar. In order to do so you need to know the control IDs. You can find those in the templates (see the "ID" field in these screenshots) or you can open the source for the procedure in the embeditor (right click on procedure and select "Source" from the popup menu) and locate declaration of the toolbar class (search for "POToolbarClass"). The IDs will be declared rigth above it and the control IDs start in a number range of 10,000.

Here is an example on how to update couple of entry fields and a checkbox button:

 loc:query     = SEA:Terms
 MinAsk        = SEA:MinAsk
 MaxAsk        = SEA:MaxAsk
 Toolbar30.SetText    (ID30_SearchEntry, loc:Query)
 Toolbar30.SetText    (ID30_MnPrice,     MinAsk)
 Toolbar30.SetText    (ID30_MxPrice,     MaxAsk)
 Toolbar30.SetChecked (ID30_Haspic,      Sea:HasImage)
 Toolbar30.Refresh(True)

Note that in order to make sure that everything is updated correctly you need to use Refresh(True) rather than just Refresh()

Arnor Baldvinsson

How can you execute an action in XP Taskpanel in code?

This is actually very simple to do, but may not be obvious. The following code was tested in the XPTaskpanelDemo_C6.app in the OpenWindow event handler in the ToolboxMenu procedure:

TaskPanel1.ExecuteAction(TaskPanel1.Demos, |
                         TaskPanel1.Demos:Colors, |
                         MouseLeft, 0)

This opens the Color Demo window when the taskpanel window opens.

Arnor Baldvinsson

1

In early 2008 I enrolled in the Microsoft Empover ISV program, which gives you access to various developer tools, MSDN subscription, etc. etc. It costs US$375 to enroll and you can re-enroll if you need to. All in all a very nice program and gives you access to a lot of software.

My Empower subscription was to expire on February 28, 2009 and couple of weeks earlier I went through the re-enrollment process and everything looked fine, except I was never charged for the $375 so I thought perhaps I had forgot how it worked and that it was a one time fee. Turns out that the re-enrollment never completed, for whatever reasons, so I recently found myself without the MSDN subscription and without access to the product keycodes on the MSDN website.

We had heard about the Microsoft BizSpark program so I decided to take a look at it - wouldn't cost anything since it's free. So I signed up for it. Wasn't optimistic that it would go through since it is for startup companies only and I have been signed up for various things at MS for several years. Didn't receive any emails or any further information so I figured it hadn't been accepted. A week later I decided to check it out and see if I could find an email address to write to to inquire about it. To my very pleasant surprise it went right into the member page so the sign-up had been successful. I found out that my MSDN subscription had been extended for 3 years, until July 2012!

To sign up, go to http://www.microsoft.com/bizspark or go to http://www.microsoftstartupzone.com/pages/home.aspx for more information. It is free to sign up, but you are required to pay $100 at the end of the membership period.

The Microsoft BizSpark is an excellent way for developers who are starting out to gain advantage by getting all the latest development tools from Microsoft. This includes anything from QuickBasic 4.5 (which was released in 1988!) to Visual Studio 2010. It includes operating systems from MS-Dos to Windows Server 2008 and Windows 7, including oddbals like Windows 3.2 (16bit). It also includes designer software like Expression Blend, Expression Design etc. The Applications section includes tools such as Access, Project, Front Page, MapPoint, MS Office, OneNote, Outlook, Virtual PC and Visio, which is an excellent database design tool - or at least to print out existing SQL databases. This just scratches the surface!

If you are looking for a good opportunity to bring yourself up to speed with the latest from Microsoft I would suggest that you look into BizSpark. It's free to start so the price is just right:)

Arnor Baldvinsson

Clarion uses dialog units as screen position measurement unit when designing windows. This is fixed and cannot be changed at design time, but it can be changed at runtime. For window design we can use PROP:Pixels and to change to pixels it is a simple matter of setting PROP:Pixels to true for the window object, like:

 WindowLabel {PROP:Pixels} = True

Or:

 0 {PROP:Pixels} = True

Since 0 (zero) always refers to the structure of the current target object. To set the window back to using dialog units, simply set PROP:Pixels to false:

 0 {PROP:Pixels} = False

It may not be immediately obvious, but you can also use a few other measurement units when dealing with windows at runtime. There are 3 more measurement units that can be used: PROP:Thous, PROP:mm and PROP:Points. If you set the properties to false Clarion goes back to dialog units. Normally we would only think of using PROP:Thous, PROP:mm and PROP:Points on reports, but they work equally well on windows!

The smallest unit you can use with PROP:Thous is 1 which equals 0.0254mm. Point is 1/72" equal to about 0.353mm. With millimeters, the smallest unit is 2 (or at least it used to be) or 100 times bigger than the smallest unit with PROP:Thous, which makes it pretty much useless for any precision placements. If I need to set sizes in metric units I convert to 1/1000" It may not always be perfect but for most things I think it is close enough.

If you have a control on a report, for example a fixed width textbox and you want the user of your software to be able to format the contents on a window so that it will look exactly as it will print, you can get the measurement from the report and use it to set the size of the textbox on a window. Let