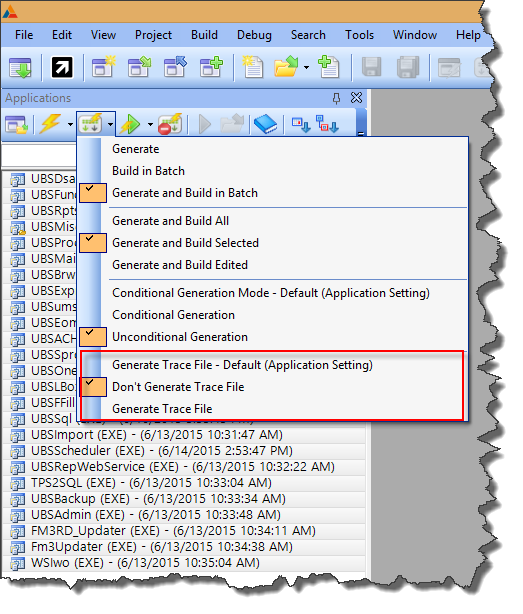
In the Applications pad there is an option in the generate/build buttons drop down list to "Generate Trace File"  Today I was wondering what this was and my first thought was that this was the template debug trace file.  But on my development virtual machine I couldn't find one even though I had found that this setting was checked.

So I asked on the Clarion 10 newsgroup and Graham Dawson set me straight on this.  This is indeed settings for the template debug trace file.
Clarion10TraceFiles
Trace File Options in the Applications pad in Clarion 10

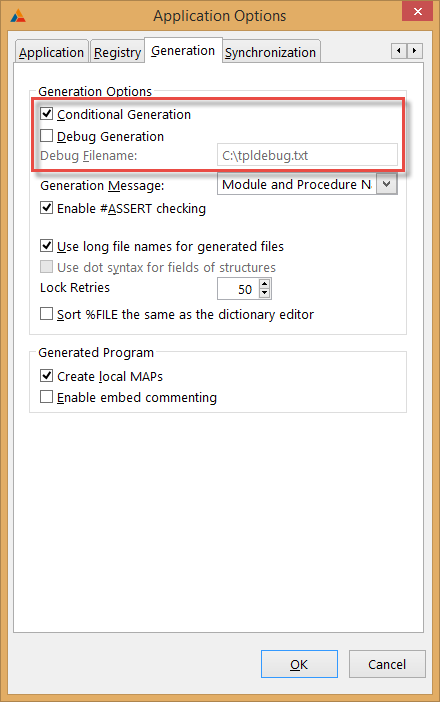
There are 3 options there:  generate, don't generate and generate by application settings.  If "Generate Trace File" is turned on, it is generated unconditionally.  If "Don't Generate Trace File" is checked, then it's not generated.  If "Generate Trace File - Default (Application Settings)" is on, then it's only generated if it's set in the Application Options.

Clarion10ApplicationOptionsTraceFiles


So what is this Trace File?  It is a file that generates all interactions with templates during generation.  It can grow to enormous size!  For example generating an application with browses and update forms, about 100 procedures, produced a file that was 3.5 GB (yes GB as in GIGA Bytes!) after a single generation!

Obviously those huge files are next to useless for template debugging because of their size and that's where the #DEBUG statement comes in.  The trace file generation can be turned on or off by using #DEBUG(1) to turn it on and #DEBUG(0) to turn it off.  But it's not quite that simple as the value must by in a symbol so you have to do something like this:

#DECLARE(%SetDebug)
#SET(%SetDebug,1)
#DEBUG(%SetDebug)
  #! Some template code here
#SET(%SetDebug,0)
#DEBUG(%SetDebug)

This would then generate just the code in between the #DEBUG statements into the trace file.

The default Trace File name in the Application Options is "C:\tpldebug.txt" and if you force the Trace File generation with the generation/build buttons, it is "C:\tpldebug2.txt"  If you change the filename in the Application Options to just be the filename, without the driveletter, i.e. "tpldebug.txt" the file is generated into the folder where the application is that you are generating.

If you feel that the generation is slower than normal, check to make sure this isn't turned on!  Even on a very fast computer generating the trace file to a SSD drive, it still slows down the generation considerably!

Arnor Baldvinsson

I do quite a bit of small hand coded test projects. Usually just a few lines of code to test some code or concept.  One of the things I like to do is add the Icetips Utilities to those projects so I can use methods like ODS (OutputDebugString)

Below I go through the steps and at the bottom is a short video of the whole process (1 minute, 31 seconds)

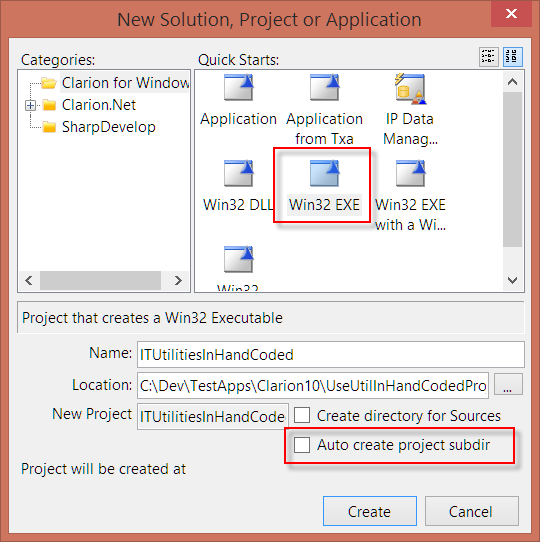
To create a small project like that you need to create a project using the "Win32 EXE" option when you create the solution.

CreateNewSolution
Creating a new source solution in Clarion 10

I also always uncheck the "Auto create project subdir" as I have normally create the folder before I create the solution, but if you haven't check this and it will create a sub folder with the name of the project.

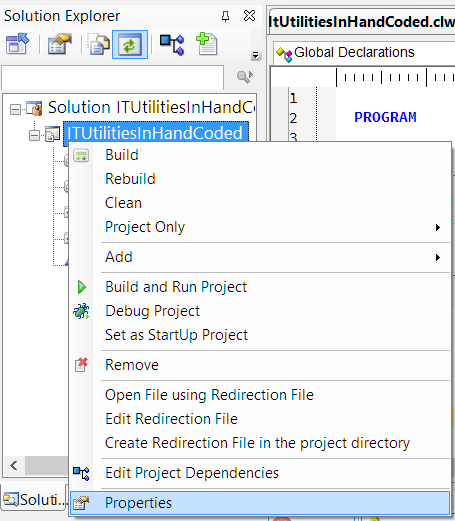
The next step is to change the project settings.  In the Solution Explorer right click on the project node and select "Properties" from the popup menu.

Clarion10OpenProjectProperties
Opening the Project Properties in Clarion 10

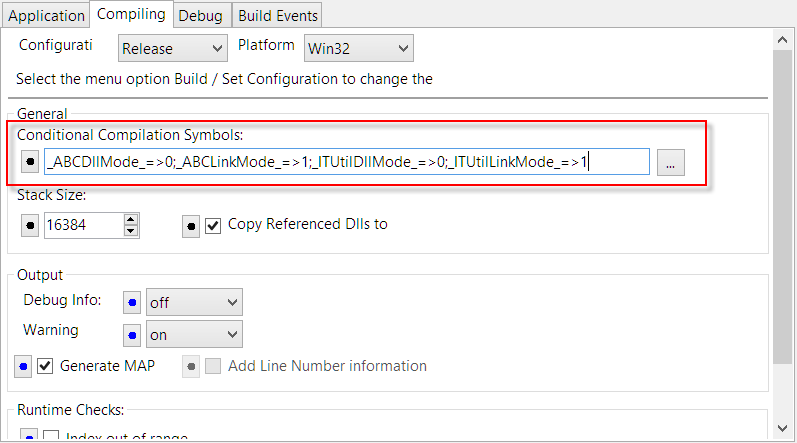
In the project properties, select the "Compiling" tab and in the "Conditional Compilation Symbols" enter:

_ABCDllMode_=>0;_ABCLinkMode_=>1;_ITUtilDllMode_=>0;_ITUtilLinkMode_=>1
Clarion10SetProjectProperties
Setting Conditional Compile Symbols in Clarion 10

This will compile both the ABC classes and the Icetips Utility classes.  Note that this setting is for an EXE.  If you are compiling a DLL, then you need to switch the 0 and 1 in the settings above.

The first thing you need to do is to include the main header file:

  INCLUDE('ITUtilityClass.inc'),ONCE

I do this above the MAP statement.

Now you can use any code from the Icetips Utilities in your project.  For example:

ITU ITUtilityClass
 CODE
 MESSAGE('Icetips Utilities: ' & ITU.EXEName)

In the video below (no sound) go through each of the steps to make this happen:

I hope this may help some of you to use the power of the Icetips Utilities in your source projects 🙂

Arnor Baldvinsson

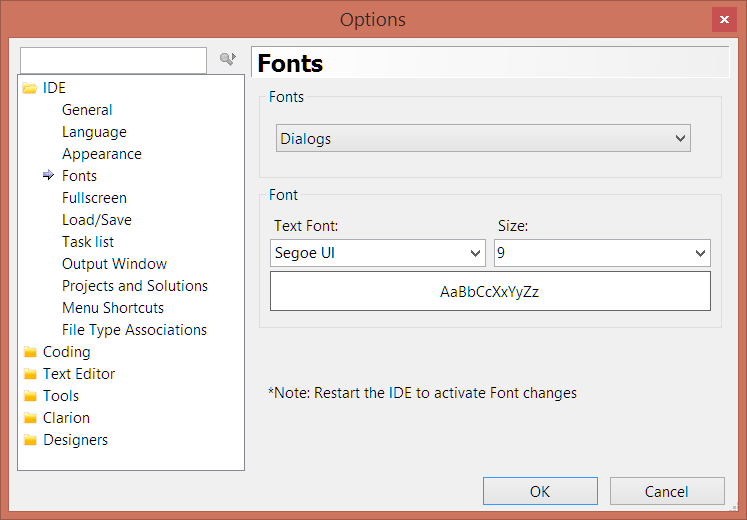
In Clarion 9.1 and 10 you can change the fonts for the IDE. This makes it easy to customize the IDE to look the way you want it to.  Personally I change the environment fonts to Segoe UI 9pt for dialogs and listboxes and Segoe UI 17pt for the Start page.

Clarion10FontSettings

I use good, old, boring Courier New 10pt for the editor but you might want to try Consolas, Lucinda Console or some other fonts.  Somehow I have ended up with one of Adobe's font on my laptop, "Source Code Pro" which comes in several different versions (black, semi-bold, light, extra-light)  The normal one looks pretty good, but I haven't really used it.  I have also used Droid Sans Mono which is a Google font.  If you want to find fonts to use in your editor, something other than Courier New, then go to fontsquirrel and have a look around.

Note that you must restart the IDE for the font changes to show.  This applies to all the font settings, also the Text Editor settings, which is a bit of a bother as you have to restart the IDE just to see how the fonts look like.  My suggestion is to load some code into WordPad and use it to pick a font that looks good to you and start from there.  WordPad has a nice feature where it will automatically reformat the text when you hover over a font in the font selection drop-down so it's easy to see how the font will affect the code.  See the video below for a demonstration.

Hope this will help you set up your environment to your liking:)

Update:  Here is an article, while from 2010, contains a nice collection of monospaced programming fonts:
http://www.codeproject.com/Articles/30040/Font-Survey-of-the-Best-Monospaced-Programming

Arnor Baldvinsson

I was staring at a completely unfamiliar window in a client project and had no idea what procedure it came from.  It was a form, so I didn't know what the original caption was and the strings on the window were pretty generic.  I needed a way to figure out what procedure this was.  Instead of spending time doing searches I decided to chance tactics and use the WindowsInitCode procedure from the Icetips Utilities to do it for me.  I explain the process in my latest Icetip.

What I did was to create a control on the window with the procedure name, as well as put it in the window caption and send it to DebugView with OutputDebugString (ODS method available in all Icetips classes)

Enjoy.

This morning I was rebooting both of my work computers and decided to run a benchmark test on them, since they were both clean and fresh. I decided to share this with my readers, just for fun. It's very interesting to see how the benchmarks come out on different computers.

I used PassMark's PerformanceTest 8.0 for the testing. It is free to evaluate and you can run your benchmark tests even if it has expired, just don't have access to some advanced options. I use their site cpubenchmark.com for CPU comparison so I figured their benchmark software would give me the best comparison with what I know.

I use two computers, "HP Pavilion" and "Snow" and I built both of them. One of them I built from scratch from a bare bone kit that I bought from TigerDirect. The other one was a "fixer-upper" from my 2008 HP Pavillion computer. It died in January 2012 and I ended up replacing everything in the case except the DVD drive and the front panel;)

HP Pavilion (I call it that even though it's only the case and the DVD drive that are left of it;) I use for day to day stuff. That includes work in MS Office, Adobe software - mostly Photoshop, Dreamveawer, Lightroom and less in the other tools offered via Adobe Creative Cloud. I also run email on it, many of the in-house programs to maintain my business etc. This machine is based on an Intel i5-2500K CPU on an ASUS P8P67-M Pro motherboard. It has 16GB of memory, Radeon HD 5400 Series video card and a 1TB Seagate SATA2 drive. On this machine I have a 26" Samsung T260 monitor and a 25" Hanns-G HH251 monitor.

PassMark Rating

Snow is a dedicated development machine and my work horse. Since the box is white I named it Snow;) I also use it as a host for virtual machines to do work in Clarion 6 and also for testing purposes. This machine is based on an Intel i7-3770K CPU on a P8Z77-V LX motherboard. It has 32GB of memory, 1TB Seagate SATA3 boot-up drive and 2TB Seagate SATA3 driver where I run my virtual machines. I'm contemplating adding a 240GB SSD drive to run the operating system and some of my programs on to add to the speed. I can easily run 3 virtual machines, each with Windows 7 Pro 32bit installed with 4GB of memory each and there is no slowdown at all. I have run 5 similar virtual machines on it and it performed without a hitch. The CPU has hyper-threading so software like VMWare effectively sees 8 cores. I can easily set each Virtual machine to use 2 cores and the CPU rarely goes above 20% usage! On this machine I just use the on-board graphic controller and don't have a dedicated video card. It's OK, but is not going to win any awards for speed;) I have two Samsung Syncmaster SA350 27" monitors on this system. One is hooked up directly via HDMI and the other one is hooked up to the DVI outlet via HDMI and a HDMI->DVI converter plug. This results in a very slight hue difference, barely noticeable but that's ok, since I use the other computer for photo work.

PassMark Rating

Click on the images to get a slightly more detailed information about the benchmark results.

I have 3 other computers in my office, a file server that I also rebuilt last year that is not anywhere close to powerful (uses i3) but it has something like 5TB of drives hooked up to it, mostly for backups but I also keep all my documents on this machine. I also keep my website code, apache web server, in-house software and version control files on that machine. A 6 year old laptop and a 10 year old development machine make up for the rest of the machines I have.

Hope this is interesting to some people:) I like messing with hardware and I enjoy building machines. If you are comfortable with it, it only takes between half an hour and an hour to put it together if everything fits. Re-using some components can take longer. For example in the HP box I had to rewire the front panel because the front panel plugs that HP uses don't match industry standards. So I had to carefully pull the wires out of the HP plug and plug each of them directly into the motherboard.

The HP was also a long and painful process. It had started to fail with hard disk errors so I backed up the drive and replaced it. Then the machine just died. Wouldn't turn on and it was just completely dead. So I replaced the motherboard and memory. Didn't help. So I replace the video card - which was a $300 NVIDIA card less than 6 months old, that was another painful and costly endeavor to try to reduce the flicker in the Clarion 8 IDE, which didn't help at all. Lo and behold, things started working again. Turned out that the drive seemed to be fine. It looks like it might have been a problem between the NVIDIA chips on the video card and the NVIDIA hard drive controller on the mother board. But I got a nice machine out of it:) I'm still using the original drive over a year later and it's working fine. I swore that NVIDIA chips would not be used in my computers again. Ever! 😉

Arnor Baldvinsson

One of the forums on our Zendesk portal is "Tips and Tricks"

I have posted two short posts there about hiding DOS/console program windows when using ITRun, ITRunFile and ITRunWait from the Shell Class and one about getting table information from MSSQL database.

I will be posting more short tips and tricks there so check it out from time to time:)

Arnor Baldvinsson

2

Since System Restore was introduced in Windows XP it has saved my behind on a number of occasions. But it has also messed things up for me because .app files are part of the restore cycle and apparently - at least in Windows 7 - so are .CLW files!

It doesn't happen often that I have to use System Restore to restore to an earlier restore point, but it has happened. Last time it happened on a virtual machine that had a Blue Screen of Death all of a sudden in the middle of a development project. It wouldn't come back up and I was in a hurry and used the "System check - recover" option or whatever it is called on the windows startup screen. It didn't indicate system restore so I let it run. Once it was done and Win7 was back up and running there was a message stating something to the effect that the computer had been rolled back to the last restore point - which was from the night before.

I checked my apps and lo and behold, they were all from the night before. So were a couple of external .clw files. Fortunately I had just placed the project into version control and even later, uploaded it to my client's FTP server so I had a copy from about an hour before the BSoD happened.

I decided to take a good look at how to prevent this from ever happening again. I have all my projects backed up and also in version control (which is also backed up) so I'm not at much risk of losing work (I HATE losing work, so I do my best never to have that happen to me!) After snooping around on the web I found several references and they all pointed in the same direction.

In the registry there are two keys that control the System Restore:

HKEY_LOCAL_MACHINE\SYSTEM\CurrentControlSet\Control\BackupRestore\FilesNotToBackup
HKEY_LOCAL_MACHINE\SYSTEM\CurrentControlSet\Control\BackupRestore\FilesNotToSnapshot

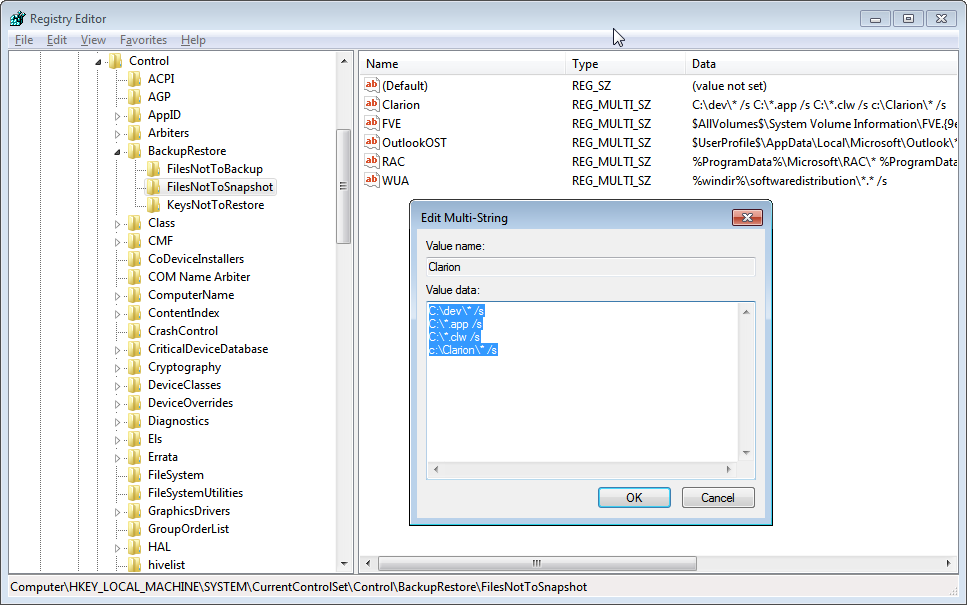
The first one affects backup and the second one affects the Volume Shadow Services (VSS), which is the technology that System Restore uses to create the snapshots, i.e. the restore points. To be on the safe side, I have modified both of them to exclude my development folders and also specifically the .app and .clw files.

Here is what I use right now:

C:\dev\* /s
C:\*.app /s
C:\*.clw /s
C:\Clarion\* /s

I create a multi-string value in those two keys, call the value "Clarion" and put those lines into the value data text box. If you want to include a folder you use the path and then \* If you want it to be recursive and contain sub-folders you add the /s switch to it. You can exclude files and folders and groom this as you like. Basically this works like the good old DIR command in DOS, for those of you old enough to remember DOS;) For those of you who don't, run cmd.exe and try dir /? in the root of your C drive and then play with it. I think the only switch available to the exclusions is the /s switch.

All my current development is in the C:\dev folder. But I also have a lot of older apps and stuff in my C:\Clarion folder so I want to exclude both of those. I also set the *.app and *.clw to be excluded anywhere on the C: drive.

If you have a second drive for your development you can simply turn System Restore off for the drive, but if you have it on the C: drive, then you need to prevent System Restore from messing with your files! I'm always running out of drives - I have 5 drives currently hooked up to my development machine, with a total of 6 Terabytes of storage! If you are like me and you use virtual machines a lot for development, remember that they also have system restore active and you need to take care of those machines as well, just like any other physical machine.

There is nothing like having to use System Restore to recover from a botched Windows update (has happened to me 2 or 3 times in the past) and then realize weeks later that bugs you had fixed have crept back in! Backups and rigorous version control are the only things that can save you from things like that! And make sure that your version control folders and files are not included in system restore backup on the version control server or you may be in for a nasty surprise if System Restore decides to restore it to what it was 6 months ago!!!

Hopefully this will help some of you to avoid disasters. If you have additional information, please comment or let me know directly:)

Arnor Baldvinsson

I have made a quick update to PowerToolbar by releasing build 2.0.165. I got a report this morning that a message window was showing up when selecting an item from a DropButton. I checked and indeed there was a Message() statment in a method there that I had used for temporary debugging and not removed when I was done:( I very rarely use Message() but rather use OutputDebugString, which I use in a method that's called ODS in all my classes. So I routinely do a search for any uncommented ODS statements but I missed that Message() statement!

Arnor Baldvinsson

I have posted a new video on Youtube. This video, that is over 20 minutes long, demonstrates how to create simple source projects in Clarion 8 and Clarion 6. It shows how to create timer loops and how to use the Progress Class with timer loops. It goes into improving performance by reducing screen updates during the process.

So far we have had over 350 total views of the videos that we have posted and we are very happy with how well they have been received! Please let me know if you have any ideas for new tutorial videos. Enjoy!

Arnor Baldvinsson