Quickstart


|
Quickstart |


|
Follow these steps to implement an Icetips OutlookBar in your application:
Add the global template
![]() Open your application (or create a new one)
Open your application (or create a new one)
![]() Press the "Global"-options button (
Press the "Global"-options button (![]() )
)
![]() Click the "Extensions"-button
Click the "Extensions"-button
![]() Click the "Insert"-button
Click the "Insert"-button
![]() Choose the "POOutlookBarGlobal - Icetips OutlookBar Global"-template
Choose the "POOutlookBarGlobal - Icetips OutlookBar Global"-template
![]()
![]() Press "Ok" two times to get back to the application
Press "Ok" two times to get back to the application
Populate the control
![]() Create a Window
Create a Window
![]() Populate "OutlookBar" control template by clicking the
Populate "OutlookBar" control template by clicking the
![]()
![]() Choose the "POOutlookBar - Icetips OutlookBar Control"-template
Choose the "POOutlookBar - Icetips OutlookBar Control"-template
![]()
![]() Place the control somewhere on you window and adjust the size.
Place the control somewhere on you window and adjust the size.
![]() Right-click on the control and choose "Actions".
Right-click on the control and choose "Actions".
![]() Now, press the "Insert"-button to bring up the "Header Editor".
Now, press the "Insert"-button to bring up the "Header Editor".

![]() In the "Title"-field, enter "Header 1" (without the quotes)
In the "Title"-field, enter "Header 1" (without the quotes)
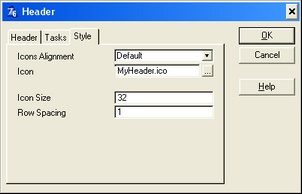
![]() Switch to the "Style tab"
Switch to the "Style tab"

![]() If you'd like an icon in the header, press the elipsis-button (...) to right of the icon-field, and choose an .ico-file.
If you'd like an icon in the header, press the elipsis-button (...) to right of the icon-field, and choose an .ico-file.
![]() Now, switch to the "Tasks" tab and click "Insert" to add a task.
Now, switch to the "Tasks" tab and click "Insert" to add a task.

![]() Enter "Task 1" in the "Title"-field
Enter "Task 1" in the "Title"-field
![]() For this task, choose "No Special Action" as "Action" on the "Action"-tab
For this task, choose "No Special Action" as "Action" on the "Action"-tab
![]() Click "Ok" to add the Task
Click "Ok" to add the Task
![]() Click "Insert" to add another task
Click "Insert" to add another task
![]() Title: Quit
Title: Quit
![]() Action: Post Event
Action: Post Event
![]() Event: EVENT:CloseWindow
Event: EVENT:CloseWindow
![]() Control:
Control:
![]() Click "Ok" to add the Task
Click "Ok" to add the Task
![]() Click "Ok" three times to get back to the window formatter.
Click "Ok" three times to get back to the window formatter.
![]() Save the window
Save the window
![]() Now, go to the embed-point "Local Objects -
Now, go to the embed-point "Local Objects -![]() Outlookbar1 -
Outlookbar1 -![]() Header_1 -
Header_1 -![]() My_First_Header:Task_1 -
My_First_Header:Task_1 -![]() Before Generated Code", and enter the following code:
Before Generated Code", and enter the following code:
Message('You selected task 1')
![]() Save, compile and run your application.
Save, compile and run your application.
The result should look something like this (the left screenshot is with the style set to "Outlook2003", the right screenshot has style set to "OutlookXP"):
|
|
When you click on "Task 1" a message saying "You selected task 1" should appear.