Advanced Browse


|
Advanced Browse |


|
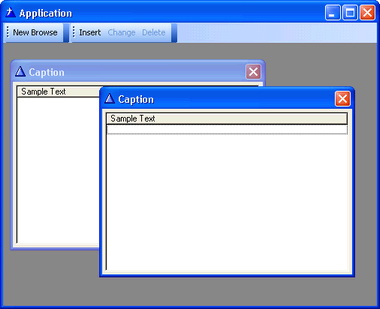
This tutorial shows how to create a browse and control it from the AppFrame toolbar. For a tutorial on how to control a browse with a toolbar in the same window as the browse, click here.
You can find the finished application can be found at: Clarion6\3rdParty\Examples\PowerToolbar\AdvancedBrowseTutorial.app
In this example you should use the dictionary named ptbexamples.dct
Part 1 - Populate templates |
![]() Create a new application (ABC)
Create a new application (ABC)
![]() Choose the ptbexample.dct from Clarion6\3rdParty\Examples\PowerToolbar as "Dictionary File".
Choose the ptbexample.dct from Clarion6\3rdParty\Examples\PowerToolbar as "Dictionary File".
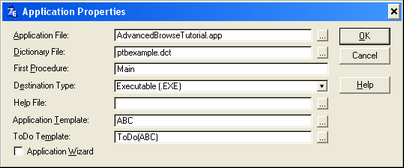
![]() Add the global PowerToolbar template
Add the global PowerToolbar template
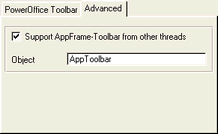
![]() Select the "Advanced"-tab of the global template
Select the "Advanced"-tab of the global template
![]() Make sure "Support AppFrame-Toolbar from other threads" is checked.
Make sure "Support AppFrame-Toolbar from other threads" is checked.
![]() Click "Ok" twice to get back to the Application Tree.
Click "Ok" twice to get back to the Application Tree.
![]() Add AppFrame
Add AppFrame
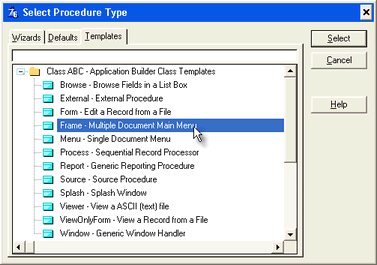
![]() Double-click the Main(Todo) procedure to bring up the "Select Procedure Type" dialog.
Double-click the Main(Todo) procedure to bring up the "Select Procedure Type" dialog.
![]() Select "Frame - Multiple Document Main Menu"
Select "Frame - Multiple Document Main Menu"
![]() Create the window
Create the window
![]() Click the Window button
Click the Window button
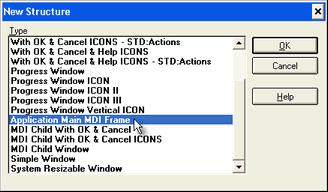
![]() Select "Application Main MDI Frame" and click OK. This will bring up the window formatter.
Select "Application Main MDI Frame" and click OK. This will bring up the window formatter.
![]() Delete the menubar (We do not want a menu for this tutorial)
Delete the menubar (We do not want a menu for this tutorial)
![]() Select the menu-item "Menu -> Delete Menu"
Select the menu-item "Menu -> Delete Menu"
![]() Create the toolbar
Create the toolbar
![]() Select the menu-item "Toolbar -> New Toolbar"
Select the menu-item "Toolbar -> New Toolbar"
![]() Populate PowerToolbar control
Populate PowerToolbar control
![]() Click the "Control Template" toolbutton
Click the "Control Template" toolbutton
![]()
![]() Choose the template "POToolbar - Toolbar Control"
Choose the template "POToolbar - Toolbar Control"

![]() Click somewhere inside the Clarion toolbar or Window to place the PowerToolbar-control.
Click somewhere inside the Clarion toolbar or Window to place the PowerToolbar-control.
Part 2 - Toolbar settings |
![]() Right-click the PowerToolbar control, and select "Actions"
Right-click the PowerToolbar control, and select "Actions"
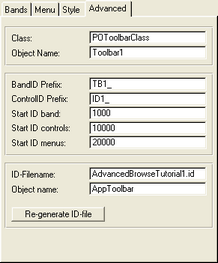
![]() Select the "Advanced" tab
Select the "Advanced" tab
![]() Notice "ID-Filename". All ID's for this toolbar will be exported to this file. You will need to select this file in the MDI Client template later in this tutorial.
Notice "ID-Filename". All ID's for this toolbar will be exported to this file. You will need to select this file in the MDI Client template later in this tutorial.
![]() "Object name" must be the same as global template setting.
"Object name" must be the same as global template setting.
![]() Add a band
Add a band
![]() Select the "Bands"-tab
Select the "Bands"-tab
![]() Click the "Insert"-button
Click the "Insert"-button
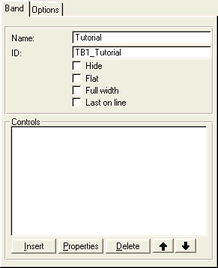
![]() As "Name", type "Tutorial"
As "Name", type "Tutorial"
![]() Add a button to start a browse
Add a button to start a browse
![]() Click the "Insert"-button
Click the "Insert"-button
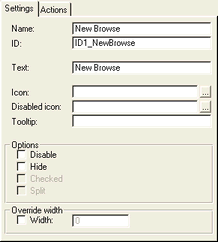
![]() Type "New Browse" in the Name field.
Type "New Browse" in the Name field.
![]() Set button action
Set button action
![]() Select the "Actions"-tab
Select the "Actions"-tab
![]() As "Action" select "Call a Procedure"
As "Action" select "Call a Procedure"
![]() Enter "TestWindow" as procedure name
Enter "TestWindow" as procedure name
![]() Check the "Initiate thread" checkbox
Check the "Initiate thread" checkbox
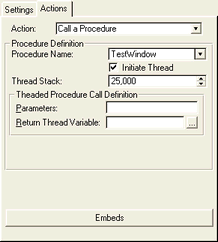
![]() Click "Ok" two times, to get back to "Bands"
Click "Ok" two times, to get back to "Bands"
![]() Add new band
Add new band
![]() Click the "Insert"-button
Click the "Insert"-button
![]() As "Name", type "Browse Control"
As "Name", type "Browse Control"
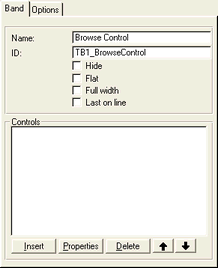
![]() Add browse "Insert" button
Add browse "Insert" button
![]() Click the "Insert"-button
Click the "Insert"-button
![]() Type "Insert" in the Name field.
Type "Insert" in the Name field.
![]() Notice the ID generated (ID1_Insert)
Notice the ID generated (ID1_Insert)
![]() Check "Disable" to make the button disabled by default
Check "Disable" to make the button disabled by default
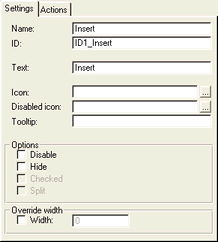
![]() Click "Ok" to save the new button
Click "Ok" to save the new button
![]() Add browse "Change" button
Add browse "Change" button
![]() Click the "Insert"-button (below the list)
Click the "Insert"-button (below the list)
![]() Type "Change" in the Name field.
Type "Change" in the Name field.
![]() Notice the ID generated (ID1_Change)
Notice the ID generated (ID1_Change)
![]() Check "Disable" to make the button disabled by default
Check "Disable" to make the button disabled by default
![]() Click "Ok" to save the new button
Click "Ok" to save the new button
![]() Add browse "Delete" button
Add browse "Delete" button
![]() Click the "Insert"-button (below the list)
Click the "Insert"-button (below the list)
![]() Type "Delete" in the Name field.
Type "Delete" in the Name field.
![]() Notice the ID generated (ID1_Delete)
Notice the ID generated (ID1_Delete)
![]() Check "Disable" to make the button disabled by default
Check "Disable" to make the button disabled by default
![]() Click "Ok" to save the new button
Click "Ok" to save the new button
![]() Click "Ok" 2 times to get back to the window formatter
Click "Ok" 2 times to get back to the window formatter
![]() Save and exit the window
Save and exit the window
![]() Compile the application
Compile the application
![]() We need to compile (or at least generate) the application to generate the ID-file (AdvancedBrowseTutorial1.id)
We need to compile (or at least generate) the application to generate the ID-file (AdvancedBrowseTutorial1.id)
![]() Compile the application (just quit it right away, we got more work to do :-)
Compile the application (just quit it right away, we got more work to do :-)
Part 3 - Create the browse |
![]() Double click the "TestWindow (Todo)"-procedure and choose "Browse - Browse Fields in a List Box" as template type
Double click the "TestWindow (Todo)"-procedure and choose "Browse - Browse Fields in a List Box" as template type
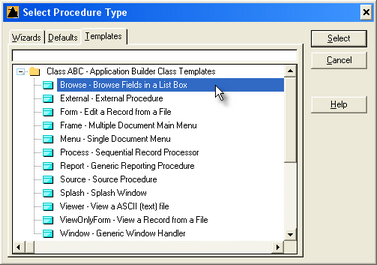
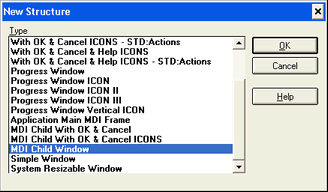
![]() Click the "Window" button and select "MDI Child Window" as window type.
Click the "Window" button and select "MDI Child Window" as window type.
![]() You should now be in the window formatter.
You should now be in the window formatter.
![]() Click the "Control template" button (
Click the "Control template" button (![]() )
)
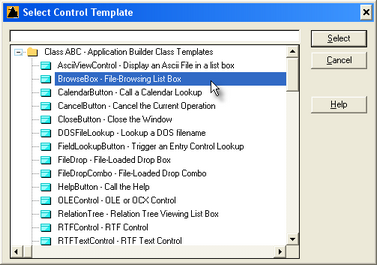
![]() Choose the "Browse Box - File-Browsing List Box"-template
Choose the "Browse Box - File-Browsing List Box"-template
![]() Place it somewhere in your window
Place it somewhere in your window
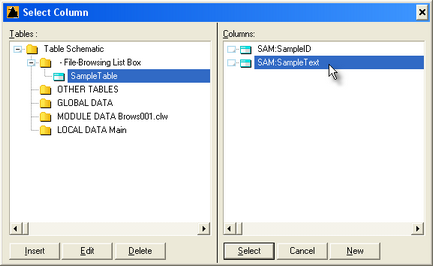
![]() Choose the "Sample Table" as table, and "SAM:SampleText" as display field.
Choose the "Sample Table" as table, and "SAM:SampleText" as display field.
![]() Click "Ok" in the list box formatter
Click "Ok" in the list box formatter
![]() Now you should add browse update buttons
Now you should add browse update buttons
![]() Click the "Control template" button (
Click the "Control template" button (![]() )
)
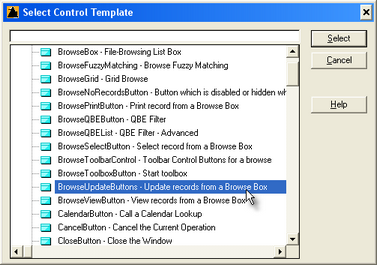
![]() Choose the "BrowseUpdateButtons - Update records from a Browse Box"-template
Choose the "BrowseUpdateButtons - Update records from a Browse Box"-template
![]() Position the buttons over the browse box
Position the buttons over the browse box
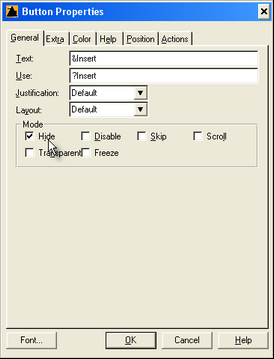
![]() Set buttons to "Hide"
Set buttons to "Hide"
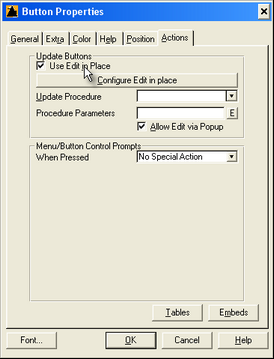
![]() On one of the button's action-tab, check the "Use Edit in-Place" option
On one of the button's action-tab, check the "Use Edit in-Place" option
Part 4 - MDI Client template |
![]() Add the MDI-template
Add the MDI-template
![]() Click the "Extensions"-button
Click the "Extensions"-button
![]() Click "Insert"
Click "Insert"
![]() Select "PowerToolbarMDIClient - PowerToolbar MDI Client"
Select "PowerToolbarMDIClient - PowerToolbar MDI Client"

![]() Set up the template
Set up the template
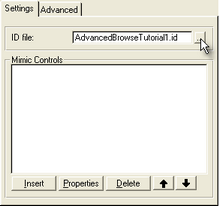
![]() Click the "..." button next to the ID-file prompt.
Click the "..." button next to the ID-file prompt.
![]() Select the "AdvancedBrowseTutorial1.id"-file. This is the file generated by the toolbar-control i the AppFrame.
Select the "AdvancedBrowseTutorial1.id"-file. This is the file generated by the toolbar-control i the AppFrame.
![]() Add button mimic for browse "Insert" button
Add button mimic for browse "Insert" button
![]() Click "Insert" to add mimic control
Click "Insert" to add mimic control
![]() Choose "ID1_Insert" as "Toolbar Button ID"
Choose "ID1_Insert" as "Toolbar Button ID"
![]() Choose "?Insert" as Control.
Choose "?Insert" as Control.
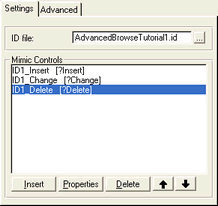
![]() We have now established a link between the toolbar button, and the insert browse update button.
We have now established a link between the toolbar button, and the insert browse update button.

![]() Click "Ok"
Click "Ok"
![]() Add button mimic for browse "Change" button
Add button mimic for browse "Change" button
![]() Click "Insert" (below the list box) to add mimic control
Click "Insert" (below the list box) to add mimic control
![]() Choose "ID1_Change" as "Toolbar Button ID"
Choose "ID1_Change" as "Toolbar Button ID"
![]() Choose "?Change" as Control.
Choose "?Change" as Control.
![]() Click "Ok"
Click "Ok"
![]() Add button mimic for browse "Delete" button
Add button mimic for browse "Delete" button
![]() Click "Insert" (below the list box) to add mimic control
Click "Insert" (below the list box) to add mimic control
![]() Choose "ID1_Delete" as "Toolbar Button ID"
Choose "ID1_Delete" as "Toolbar Button ID"
![]() Choose "?Delete" as Control.
Choose "?Delete" as Control.
![]() Click "Ok"
Click "Ok"
Part 5 - Try application |
![]() Compile and run
Compile and run
![]() Click "Ok" to get back to the application tree
Click "Ok" to get back to the application tree
![]() Compile and run the application
Compile and run the application
![]() Try opening and closing a browse
Try opening and closing a browse
![]() Try several browses open and controling them from the toolbar
Try several browses open and controling them from the toolbar
