Simple Browse tutorial


|
Simple Browse tutorial |
|
In this tutorial you will learn how to use PowerToolbar to easily control your browses. This tutorial explains how to use a toolbar to control a browse in the same window. For advanced control across multiple threads, see the Advanced Browse tutorial.
The example below will set up a window with a browse and a toolbar to update it. You can find the finished application at: Clarion6\3rdParty\Examples\PowerToolbar\BrowseTutorial.app
In this example you should use the dictionary named ptbexamples.dct
Simple Browse control tutorial |
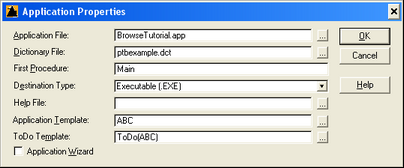
![]() Create a new application (ABC)
Create a new application (ABC)
![]() Choose the ptbexample.dct from Clarion6\3rdParty\Examples\PowerToolbar as "Dictionary File".
Choose the ptbexample.dct from Clarion6\3rdParty\Examples\PowerToolbar as "Dictionary File".
![]() Add the global PowerToolbar template
Add the global PowerToolbar template
![]() Double click the "Main (Todo)"-procedure and choose "Browse - Browse Fields in a List Box" as template type
Double click the "Main (Todo)"-procedure and choose "Browse - Browse Fields in a List Box" as template type

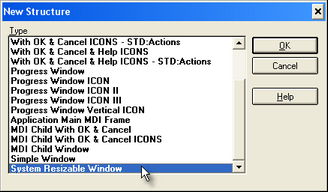
![]() Click the "Window" button and select "System Resizable Window" as window type.
Click the "Window" button and select "System Resizable Window" as window type.
![]() You should now be in the window formatter.
You should now be in the window formatter.
![]() Click the "Control template" button (
Click the "Control template" button (![]() )
)
![]() Choose the "Browse Box - File-Browsing List Box"-template
Choose the "Browse Box - File-Browsing List Box"-template

![]() Place it somewhere in your window
Place it somewhere in your window
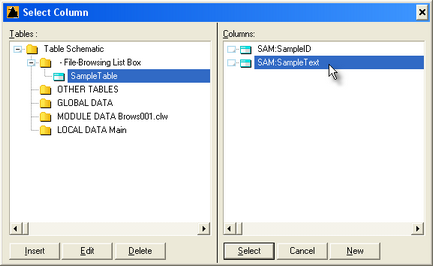
![]() Choose the "Sample Table" as table, and "SAM:SampleText" as display field.
Choose the "Sample Table" as table, and "SAM:SampleText" as display field.
![]() Click "Ok" in the list box formatter
Click "Ok" in the list box formatter
![]() Now you should add browse update buttons
Now you should add browse update buttons
![]() Click the "Control template" button (
Click the "Control template" button (![]() )
)
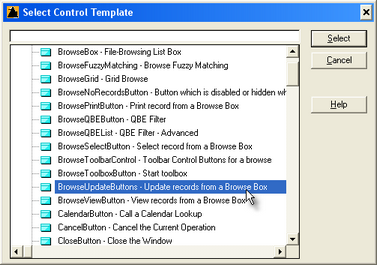
![]() Choose the "BrowseUpdateButtons - Update records from a Browse Box"-template
Choose the "BrowseUpdateButtons - Update records from a Browse Box"-template
![]() Position the buttons over the browse box
Position the buttons over the browse box
![]() Set buttons to "Hide"
Set buttons to "Hide"
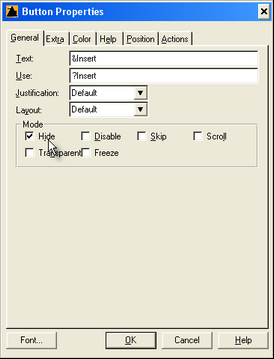
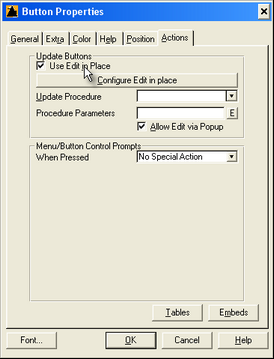
![]() On one of the button's action-tab, check the "Use Edit in-Place" option
On one of the button's action-tab, check the "Use Edit in-Place" option
![]() Add PowerToolbar to your window
Add PowerToolbar to your window
![]() Click the "Control template" button (
Click the "Control template" button (![]() )
)
![]() Choose the "POToolbarControl - Toolbar Control"-template
Choose the "POToolbarControl - Toolbar Control"-template
![]()
![]() Position at the top of your window
Position at the top of your window
![]() Right-click the toolbar control, and choose "Position"
Right-click the toolbar control, and choose "Position"
![]() Set Width to "Full"
Set Width to "Full"
![]() Add toolbar band
Add toolbar band
![]() Right-click the toolbar control, and choose "Actions"
Right-click the toolbar control, and choose "Actions"
![]() Click the "Insert" button to add a band
Click the "Insert" button to add a band
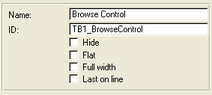
![]() Enter "Browse Control" as band name
Enter "Browse Control" as band name
![]() Add toolbar buttons
Add toolbar buttons
![]() Click the "Insert" button to add a button
Click the "Insert" button to add a button
![]() Choose "MimicButton" as "Control type"
Choose "MimicButton" as "Control type"
![]() Enter "Insert" as "Name"
Enter "Insert" as "Name"
![]() In the "Mimic Button"-dropdown, choose the "?Insert"-button
In the "Mimic Button"-dropdown, choose the "?Insert"-button
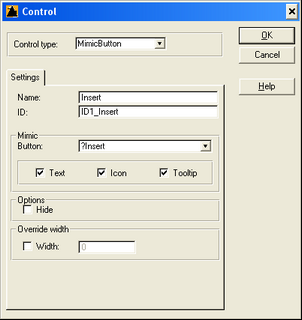
![]() Click "Ok"
Click "Ok"
![]() Now, repeat this step for the ?Change and ?Delete button
Now, repeat this step for the ?Change and ?Delete button
![]() Save and compile your application
Save and compile your application
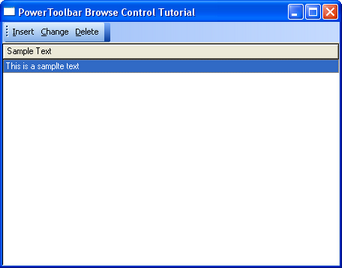
![]() After starting your application, you can click the "insert" button to add a new record.
After starting your application, you can click the "insert" button to add a new record.
In this tutorial we used "Edit in-Place", but this method works just as well if you use an update form instead.