AppToolbar control from a different thread


|
AppToolbar control from a different thread |


|
It is possible to control the AppFrame PowerToolbar from any thread in your application. In this tutorial you will be taken through the steps needed.
The finished application for this tutorial can be found at: Clarion6\3rdParty\Examples\PowerToolbar\AppToolbarTutorial.app
|
|
Part 1 - Populate templates |
![]() Create a new application
Create a new application
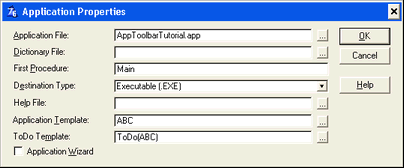
![]() Add the global PowerToolbar template
Add the global PowerToolbar template
![]() Go to the "Advanced" tab
Go to the "Advanced" tab
![]() On the advanced tab of the global template, make sure "Support AppFrame-Toolbar from other threads" is checked.
On the advanced tab of the global template, make sure "Support AppFrame-Toolbar from other threads" is checked.
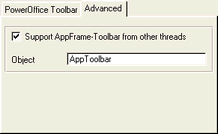
![]() Notice the Object name (AppToolbar). This is what we will refer to in our code later on.
Notice the Object name (AppToolbar). This is what we will refer to in our code later on.
![]() Click "Ok" twice to get back to the Application Tree.
Click "Ok" twice to get back to the Application Tree.
![]() Add AppFrame
Add AppFrame
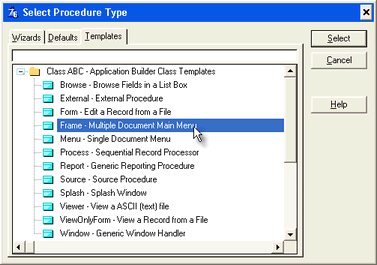
![]() Double-click the Main(Todo) procedure to bring up the "Select Procedure Type" dialog.
Double-click the Main(Todo) procedure to bring up the "Select Procedure Type" dialog.
![]() Select "Frame - Multiple Document Main Menu"
Select "Frame - Multiple Document Main Menu"
![]() Create the window
Create the window
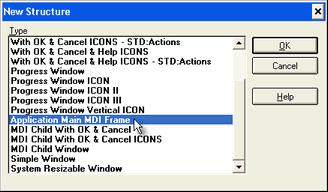
![]() Click the Window button
Click the Window button
![]() Select "Application Main MDI Frame" and click OK. This will bring up the window formatter.
Select "Application Main MDI Frame" and click OK. This will bring up the window formatter.
![]() Delete the menubar (We do not want a menu for this tutorial)
Delete the menubar (We do not want a menu for this tutorial)
![]() Select the menu-item "Menu -> Delete Menu"
Select the menu-item "Menu -> Delete Menu"
![]() Create the toolbar
Create the toolbar
![]() Select the menu-item "Toolbar -> New Toolbar"
Select the menu-item "Toolbar -> New Toolbar"
![]() Populate PowerToolbar control
Populate PowerToolbar control
![]() Click the "Control Template" toolbutton
Click the "Control Template" toolbutton
![]()
![]() Choose the template "POToolbar - Toolbar Control"
Choose the template "POToolbar - Toolbar Control"

![]() Click somewhere inside the Clarion toolbar or Window to place the PowerToolbar-control.
Click somewhere inside the Clarion toolbar or Window to place the PowerToolbar-control.
Part 2 - Toolbar settings |
![]() Right-click PowerToolbar control, and select "Actions"
Right-click PowerToolbar control, and select "Actions"
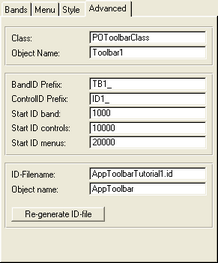
![]() Select the "Advanced" tab
Select the "Advanced" tab
![]() Notice "ID-Filename". All ID's for this toolbar will be exported to this file. You will need to select this file in the MDI Client template later in this tutorial.
Notice "ID-Filename". All ID's for this toolbar will be exported to this file. You will need to select this file in the MDI Client template later in this tutorial.
![]() "Object name" must be the same as global template setting.
"Object name" must be the same as global template setting.
![]() Add a band
Add a band
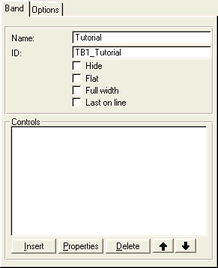
![]() Select the "Bands"-tab
Select the "Bands"-tab
![]() Click the "Insert"-button
Click the "Insert"-button
![]() As "Name", type "Tutorial"
As "Name", type "Tutorial"
![]() Add a button
Add a button
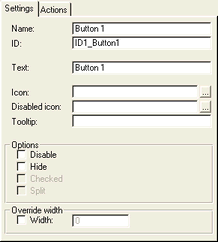
![]() Click the "Insert"-button
Click the "Insert"-button
![]() Type "Button 1" in the Name field.
Type "Button 1" in the Name field.
![]() Set button action
Set button action
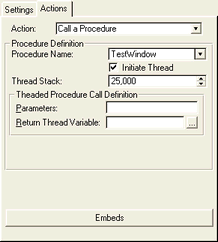
![]() Select the "Actions"-tab
Select the "Actions"-tab
![]() As "Action" select "Call a Procedure"
As "Action" select "Call a Procedure"
![]() Enter "TestWindow" as procedure name
Enter "TestWindow" as procedure name
![]() Check the "Initiate thread" checkbox
Check the "Initiate thread" checkbox
![]() Click OK three times to get back to the window formatter
Click OK three times to get back to the window formatter
![]() Save and exit the window
Save and exit the window
![]() Compile the application
Compile the application
![]() You must do this to generate the ID-file (AppToolbarTutorial1.id)
You must do this to generate the ID-file (AppToolbarTutorial1.id)
Part 3 - Set up Test window |
![]() Create the window
Create the window
![]() Double-click the "TestWindow (ToDo)"-procedure
Double-click the "TestWindow (ToDo)"-procedure
![]() Select "Window - Generic Window Handler"
Select "Window - Generic Window Handler"

![]() Click the "Window button"
Click the "Window button"
![]() Select "MDI Child Window"
Select "MDI Child Window"
![]() Save and exit the window formatter
Save and exit the window formatter
![]() Add the MDI-template
Add the MDI-template
![]() Click the "Extensions"-button
Click the "Extensions"-button
![]() Click "Insert"
Click "Insert"
![]() Select "PowerToolbarMDIClient - PowerToolbar MDI Client"
Select "PowerToolbarMDIClient - PowerToolbar MDI Client"

![]() Set up the template
Set up the template
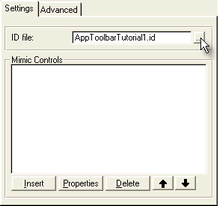
![]() Click the "..." button next to the ID-file prompt.
Click the "..." button next to the ID-file prompt.
![]() Select the "AppToolbarTutorial1.id"-file. This is the file generated by the toolbar-control i the AppFrame.
Select the "AppToolbarTutorial1.id"-file. This is the file generated by the toolbar-control i the AppFrame.
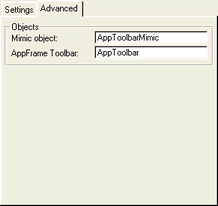
![]() Click the "Advanced"-tab
Click the "Advanced"-tab
![]() Notice "AppFame Toolbar". This is the object name that we saw in both the global template, and the AppFrame toolbar-control.
Notice "AppFame Toolbar". This is the object name that we saw in both the global template, and the AppFrame toolbar-control.
![]() Click OK to get back to the Procedure Properties window.
Click OK to get back to the Procedure Properties window.
![]() Click the "Window" button to get to the window formatter.
Click the "Window" button to get to the window formatter.
![]() Place a button on the window
Place a button on the window
![]() Make sure "Use" is ?Button1
Make sure "Use" is ?Button1
![]() Code some actions for the toolbar
Code some actions for the toolbar
![]() Select the "Actions"-tab
Select the "Actions"-tab
![]() Click the embed button
Click the embed button
![]() Double click "Control Events -> ?Button1 -> Accepted -> Generated Code"
Double click "Control Events -> ?Button1 -> Accepted -> Generated Code"

![]() Select "Source" as Embed type
Select "Source" as Embed type
![]() Enter code to manipulate the toolbar
Enter code to manipulate the toolbar
![]() AppToolbar is a global object which you can use to control the appframe-toolbar
AppToolbar is a global object which you can use to control the appframe-toolbar
![]() The various AppToolbar methods is described here
The various AppToolbar methods is described here
![]() Enter the following code into the source editor
Enter the following code into the source editor
!Manipulate AppFrame toolbar button
!Enable/Disable
If AppToolbar.GetEnabled(ID1_Button1) !Check if button is enabled
AppToolbar.SetEnabled(ID1_Button1, False) !Disable button
Else
AppToolbar.SetEnabled(ID1_Button1, True) !Enable button
End
!Change text
If AppToolbar.GetText(ID1_Button1) = 'Button 1' !Get button text
AppToolbar.SetText(ID1_Button1, 'Hello world!') !Set new text
Else
AppToolbar.SetText(ID1_Button1, 'Button 1') !Set back to default text
End
![]() Save and exit the source editor
Save and exit the source editor
Part 4 - Test the application |
![]() Compile and run the application.
Compile and run the application.
![]() Click "Button 1" in the toolbar to open our test-window.
Click "Button 1" in the toolbar to open our test-window.
![]() Click "Button 1" in the test-window and observe what happens to the toolbar button.
Click "Button 1" in the test-window and observe what happens to the toolbar button.
|
|